How To Fix Cracking Leather Seats: A Step-by-Step Guide To Repair Tears And Cracks
Leather seats are a luxurious addition to any vehicle, providing comfort and style. However, they are prone to tears and cracks if not properly maintained. This article will guide you through the process of how to fix cracking leather seats using a variety of methods and tools.
Understanding the Damage
Before you begin the repair process, it’s important to assess the damage. Leather seats can suffer from various types of damage, including small cracks, deep tears, and even holes. Each type of damage requires a different approach, so understanding what you’re dealing with is the first step.
Small cracks often appear due to regular wear and tear or exposure to the sun. These cracks can be superficial, affecting only the leather’s surface, or deep, reaching the underlying material. Deep tears, on the other hand, are usually caused by sharp objects or excessive pressure on the seat. Holes can occur due to punctures or severe wear.
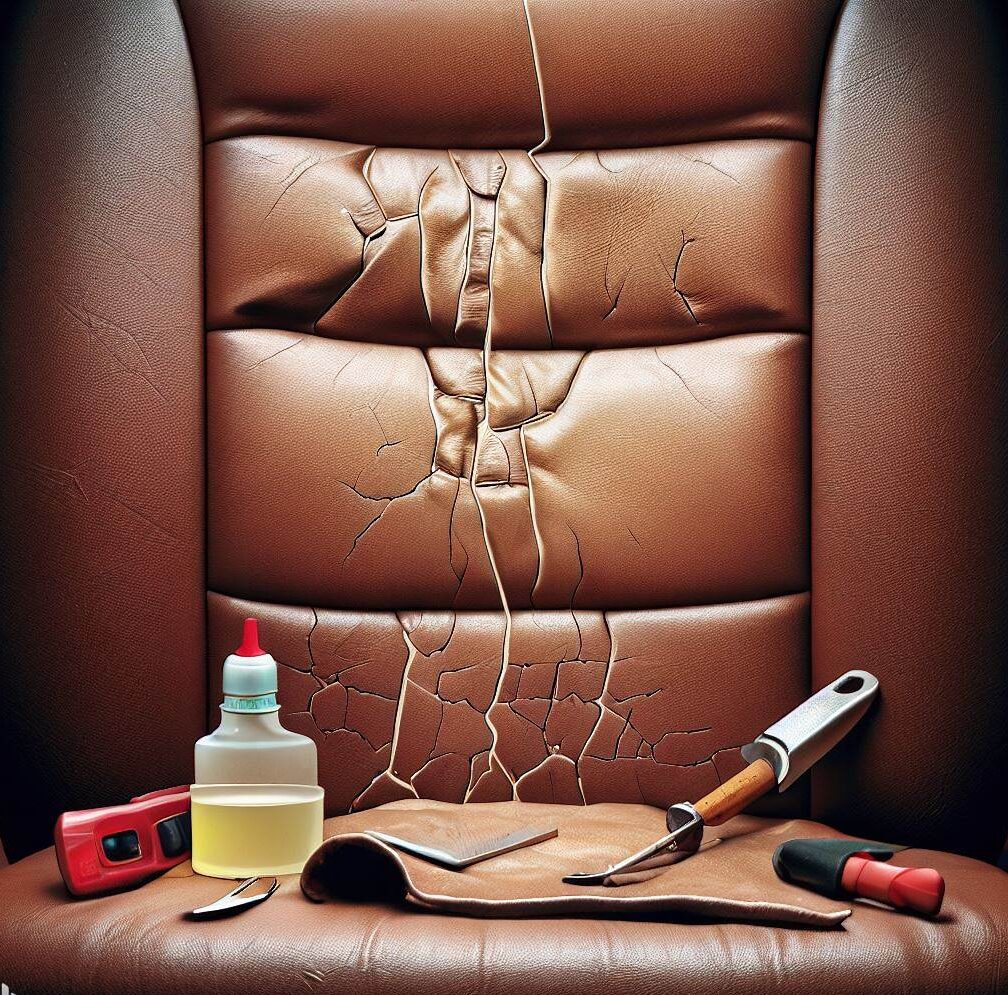
Tools and Materials Needed for Repair
To repair leather seats, you will need a variety of tools and materials. These include:
- Cleaning materials: Before starting the repair, it’s important to clean the area thoroughly. This will help the repair materials adhere better to the leather. You can use mild dish soap and warm water for this purpose. A cleaning and microfiber cloth will also be needed to clean and dry the area.
- A sewing material: For deep tears, you will need a strong thread matching your leather seats’ color. A leather needle will also be required to sew the tear together.
- A compound fluid: This is used to fill in small cracks and creases. The compound should be flexible and durable to withstand the wear and tear of regular use.
- A hot glue gun: This is used to attach patches to the leather in case of holes.
- A textured sponge: This is used to blend the repair with the rest of the seat.
- Paint: You will need paint that matches the color of your leather seats. This covers the repaired area and blends with the rest of the seat.
- A paint top coat: This is applied over the paint to protect it and give it a glossy finish.
These tools can be found in most auto repair shops or online.

Repairing Small Cracks and Creases
For smaller cracks and creases, a compound mixture is the most effective solution. This compound can be maneuvered to fit the mold you need, and it’s essential to choose the right mixture based on the type of leather you are working with.
After cleaning the area, apply the compound to the cracks using a spatula or a similar tool. Make sure to fill in the cracks completely, but avoid applying too much compound, as this can make the repair evident and unattractive.
After applying the compound, use a heat gun to help it dry. The heat will make the compound harden and adhere to the leather. Be careful not to overheat the area, as this can cause the leather to warp or discolor.
Once the compound is dry, rub a texture sponge over the spot to blend it with the rest of the seat. This will help the repair look more natural and less noticeable.
Finally, apply paint and a finishing top coat for an even finish. The paint should match the color of your leather seats as closely as possible. The top coat will protect the paint and give it a glossy finish, blending the repair with the rest of the seat.
Fixing Larger Tears
Larger tears require a different approach. First, cut a piece of denim larger than the torn area and insert it into the hole under the torn area. Apply a strong, flexible fabric glue to the denim and press down onto the leather. Allow this to dry for a few minutes.
Then, using a leather needle and matching leather thread, sew the tear together. Be careful to keep the stitches small and close together to make the repair less noticeable.
After sewing the tear, apply a layer of leather putty to fill in any remaining gaps. The putty should be spread evenly over the repair, blending it with the surrounding leather.
Once the putty has dried, apply a matching leather dye to blend the repair with the rest of the seat. The dye should be applied in thin layers, allowing each layer to dry before applying the next. This will help achieve a more natural color match with the rest of the seat.
Repairing Holes
Holes in leather seats can be repaired using a similar method to tears. However, for larger holes, you may need to use a patch of matching leather. Cut the patch so that it is slightly larger than the hole, and round the edges to make it blend in better with the rest of the seat.
Apply a strong adhesive to the patch, and then place it over the hole. Press down firmly to ensure a good bond, and then allow the adhesive to dry completely.
Once the patch is securely attached, use a leather putty to blend the edges of the patch with the rest of the seat. Apply the putty in thin layers, allowing each layer to dry before applying the next.
Finally, apply a matching leather dye to the patch and the surrounding area. This will help the patch blend in with the rest of the seat, making the repair less noticeable.
Preventing Further Damage
Prevention is always better than cure. To prevent further damage to your leather seats, consider the following tips:
- Avoid parking in the sun for long stretches of time, as this can cause the leather to fade and crack. If you must park in the sun, use a sun shield to protect your seats.
- Avoid placing sharp or bulky objects on the seats, as these can cause tears and scratches. If you must transport such items, consider using seat covers or placing a blanket over the seats.
- Regularly clean and condition your seats to protect against cracking and other signs of wear. Use a leather conditioner that is specifically designed for automotive use, and follow the manufacturer’s instructions for best results.
By following these steps, you can keep your leather seats looking as good as new for years.
Conclusion
Fixing tears and cracks in leather seats may seem daunting, but with the right tools and a bit of patience, it’s a task that most car owners can handle. Remember, the key to a successful repair is understanding the extent of the damage and choosing the right method and materials for the job. And remember, prevention is always better than cure, so take good care of your leather seats to keep them looking their best.
Frequently Asked Questions
To further assist you, we’ve compiled a list of frequently asked questions related to leather seat repair:
- How do you repair cracked or torn leather seats? Repairing cracked or torn leather seats involves cleaning the area, applying a compound fluid to fill in the cracks or sewing more giant tears, and then applying paint and a top coat to blend the repair with the rest of the seat.
- Can cracked leather seats be repaired? Yes, cracked leather seats can be fixed using a compound fluid that fills in the cracks. Once the compound has dried, the area can be painted to match the rest of the seat.
- Why are my leather seats tearing? Leather seats can tear due to a variety of reasons, including sharp objects, excessive pressure, and regular wear and tear. Routine maintenance and proper care can help prevent tears from occurring.
- How can I prevent my leather seats from cracking or tearing? To prevent your leather seats from cracking or tearing, avoid parking in the sun for long periods, avoid placing sharp or bulky objects on the seats, and regularly clean and condition your seats.
- What materials do I need to repair leather seats? To repair leather seats, you will need cleaning materials, a sewing material (for deep tears), a compound fluid (for small cracks), a hot glue gun (for holes), a textured sponge, paint, and a paint top coat.
- Can I repair leather seats myself? Yes, with the right tools and a bit of patience, most car owners can repair leather seats themselves. However, for severe damage, it may be best to seek professional help.
- How long does it take to repair leather seats? The time it takes to repair leather seats can vary depending on the extent of the damage. Small cracks can be repaired in a few hours, while larger tears or holes may take a day or more.
- How much does it cost to repair leather seats? The cost of repairing leather seats can vary depending on the extent of the damage and whether you do it yourself or hire a professional. Doing it yourself can be a cost-effective option, especially for minor repairs.
- What is the best leather repair kit? The best leather repair kit will depend on your specific needs. However, a good kit should include a compound fluid, a textured sponge, paint, and a top coat. Some kits may also include sewing material and a hot glue gun.
- Can I use shoe polish to repair leather seats? While shoe polish can be used to cover up minor scratches on leather seats, it is not recommended for repairing cracks or tears. A compound fluid or a leather repair kit will provide a more durable and effective repair.